Install, configure and Deploy Project Server 2013
1. Lab
I created my lab using hyper-v with 3 virtual machines:
- Virtual Machine 1: Active Directory.
- Virtual Machine 2: MS Poject Server 201.
- Virtual Machine 3: MS SQL Server 2014
2. Prepare for a deployment of Project Server 2013
2.1. Hardware and Software Requirements:
First step is to make sure you have the hardware and the software meets the requirement of the environment.
http://technet.microsoft.com/en-us/library/ee683978.aspx
2.2. Installation account:
Ensure that you have access to the necessary accounts and permissions to install Project Server 2013.
I created 5 accounts for MS Project:
- SharePoint Admin (spadmin): The SharePoint administrator.
- SharePoint Installer (spinstall): This account to install SharePoint Server.
- SQL Administrator (sqladmin): This account for installation and administration of SQL Server.
- SharePoint Farm (spfarm): The SharePoint Farm administrator.
- Service Application Pool (psServiceAppPool): Runs the application pool associated with the Project Server service application.
- Web Application Pool (psWebAppsPool): Runs the application pool associated with the Web application that will use PWA.

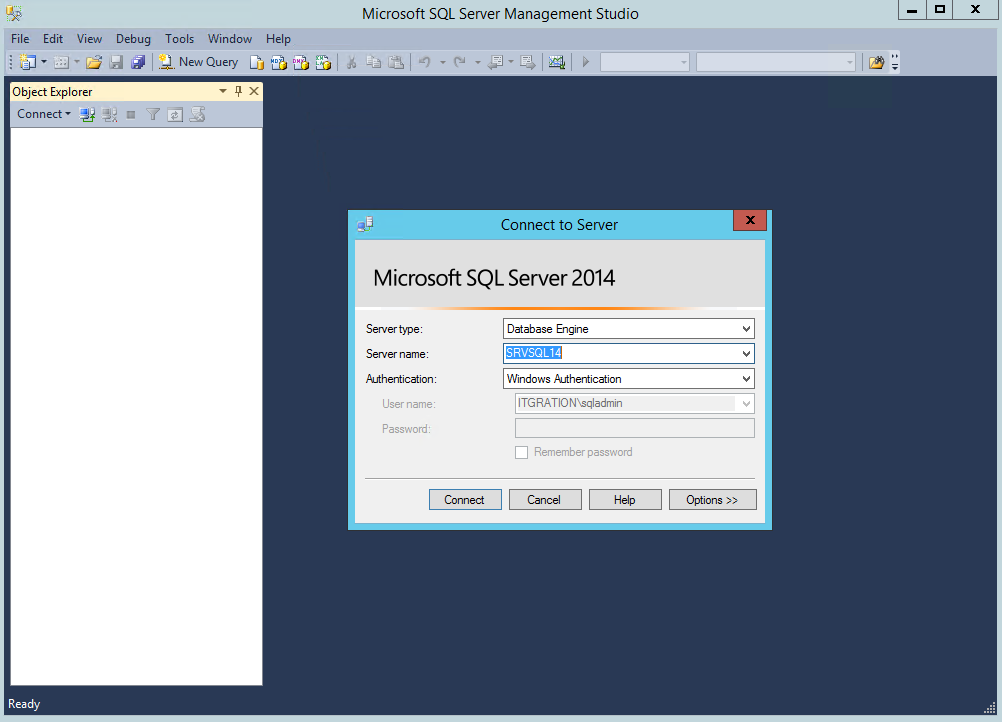
3. Installation and configuration SQL Server 2014:
Lunch the setup from the SQL Server 2014


Choose the features blow


Add the SQL Server Administrator

Add "sqladmin", "spfarm" and "spadmin" to Analysis Services, we will need them later

Choose "Install and configure" the Reporting Services. If you want to configure it later juste select "Install only"


4. Installation and configuration SharePoint Server 2013
4.1. Install SharePoint Server 2013:
Log in with "spinstall" account, the account must have admin permissions.
Launch the setup from SharePoint media

Before installing SharePoint, we need first to install software prerequisites. Make sure the server is connected to internet.


Choose "Complete", we already have an SQL Server


Uncheck "Run the SharePoint Products Configuration Wizard now". We will launch it with "spfarm" account.

4.2. Configuration SharePoint Server Farm:
Log in with "spfarm" account

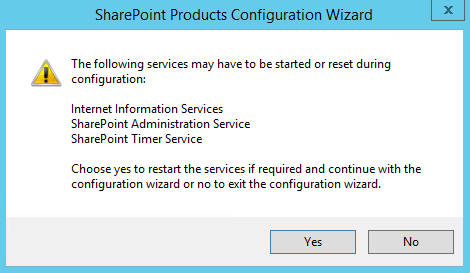
Execute "SharePoint Products Configuration Wizard"


Select "Create a new server farm"

Enter the Database Server and specify the Database access account. You need to add "spfarm" to SQL Server security connection

Specify Farm Security passphrase, you will need it if the farm is disconnected from SQL Server

Choose a port number for the Central Administration


Add "spadmin" to "Farm Administrators"

5. Installation and configuration MS Project Server 2013:
5.1. Installation MS Project Server 2013:
On the same SharePoint Server, launch the setup of MS Project Server from the installation media

Execute "Install Project Server"


5.2. Configure SharePoint server with MS Project:
Execute "SharePoint Products Configuration Wizard"


The Central Administration will be Open, check the installation is Configured successfully:
From Side Menu, click on Upgrade and Migration. Then From Upgrade and Migration Page, click on Check Upgrade Status

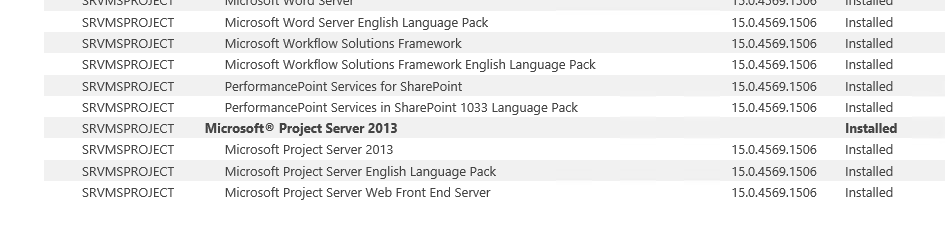
Confirm that MS Project Server 2013 is installed
On Central Administration, click on System Settings then Manage services on server

Start Project Server Application Service
5.3.Register a managed account:
The account that you plan to use for the application pool for the Project Server service application must be a registered account in SharePoint Server.
On the Central Administration, click Security. Then, On the Security page, in the General Security section, click Configure managed accounts.

5.4. Create a Project Server service application:
On Central Administration, Application Management then Manage service applications


Give a name for the MS Project Server service

Select the account that you want to use to run the application pool.

5.5. Deploy MS Project Server to the web application:
In Central Administration, Application Management and Create site collections


Type the user name and password of the domain account that you are registering.


Now, creating the web site
On Site Collections, click on Create site collections

Give a name for the web site

Specify the site collection administrators


5.6. Create a Project Web App site:
On Application Management, click Manage content databases


Give a name for the database


Go to Application Management, Service Applications and then Manage service applications

Click on Project Service Application
Click on Create Project Web App Instance

- Select The Web application for the Project Web App site
- Enter The path from the root site for this Project Web App site
- Enter The user interface language for this Project Web App site

Enter the user account that will be added to the Administrators for Project Web App security group in this instance of Project Web App.
Enter The Database Information


Project Server starts the Project Web App site creation process. This may take some time. When the site creation process is complete, the status shown on the Project Web App site list is Provisioned.

You can now access the new Project Web App site.

6. Configure MS Project client:
First, we need to add the user to Project Managers for Project Web App group. On the MS Project Web, go to Site settings

Click on Site permissions

Go to Project Managers for Project Web App

Add the user to the group

We need to configure the client. Go to Project Server 2013 accounts. Click Add

Give the Account Name and the Project Server URL. Set it as default account.

Click Yes


Now the client is configured. We are ready to launch MS Project 2013 client


No comments:
Post a Comment