Tuesday, November 25, 2014

Anonymous Access SharePoint 2013

Anonymous Access SharePoint 2013


Trying to access to the web site SharePoint and you have the authentication Windows appears:


To activate anonymous access to the web site Sharepoint:

Go to "Central Administration" - "Manage web applications"


Select the web Application then click on "Authentication Providers"


Click on "Default"

Check "Enable anonymous access"


Log to the Web Application with Admin user, go to "Site Settings"


under "Users and Permissions" go to "Site permissions"


Click on "Anonymous Access"


Check "Entire Web site"


Now let's check the access


Monday, November 24, 2014

Personalize Deploy Reports folder permission in SQL 2012

Personalize Deploy Reports tutorial in SQL Reporting Server 


1. Overview:

SQL Server Reporting Services 2012 (SSRS) is a feature included in the SQL Server 2012 product.  We use SSRS to design, develop, and deploy reports.  SSRS was originally slated to be released with SQL Server 2005 but it wound up being released a little bit ahead of SQL Server 2005.  SSRS leverages the Business Intelligence Development Studio (BIDS) developer tool for all aspects of authoring and deploying reports.  BIDS is included with SQL Server 2012.

In this tutorial we will setup a topic that you need to grant permissions for each user to view the report without have access to other reports.

2. Configuration:

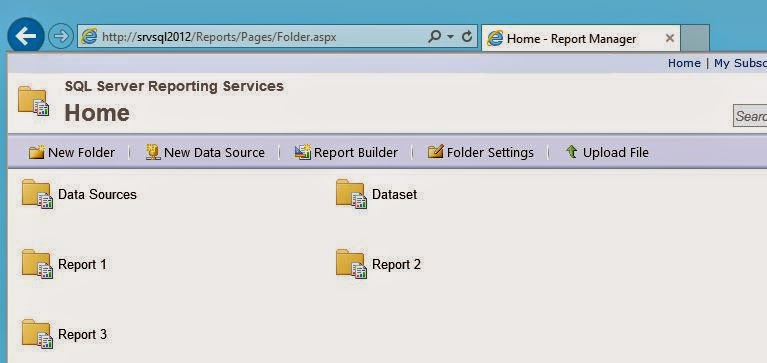
First we have our reports deployed: Report 1, Report 2, Report 3


I created 6 users in Active directory each 2 users are members in 3 groups: Group A, Group B, Group C.


Each Group must view his own report folder.

We need to access to Reporting services with SQL Admin to create a new role


Go to Security - Roles

Click on New Role

Give a name to the role and select View tasks

Now we need to access to Reporting web page with Admin.
Click "Folder Settings"


In security add the 3 Groups and assign the role we created in the previous step


All groups can view all the folders report, we need to remove Groups that they don't need to access to other folders.

Select the folder and go to "Security"

In Report 1 folder we need only Group A, so we remove Group B and C

Do same thing for folder 2 but this time we keep Group B to access


We access to reporting web page with User.One


Now let's try to open a report

We got an error, no worries, that's because reporting services uses the user authentification who hasn't permission in SQL Server

Go back to Reporting web with Admin, enter to Data Sources Folder and edit the Source connection

Select "Credentials stored securely in the report", enter Admin login/password and check "use as Windows credentials"

Access again with User.One and open the report

Let's try with another user


Monday, November 17, 2014

Oracle 11g Database on linux Redhat Server 5.5

Oracle 11g Database on linux Redhat Server 5.5


1. Install Linux Redhat Enterprise Server 5.5:

Create a virtual machine using VirtualBox, Hyper-v or Vmware. Attach the iso to the VM. Start the installation:

Press "Enter" to install with graphical mode
Choose "Skip" to ignore the testing of the CD media

Choose the language
Select the language of the keyboard
If you have a Subscription number you can add it for update or install other packages from Redhat

Format the Disk but we will go back again to modify the swap


Modify the swap size (x2 physical memory)


Enter a password for the root account


Disable the Firewall
Disable SELinux


Enter a user account and set a password


Login with root account

The install of Redhat server is complete, we need to make other configuration.
Open a terminal and tape "setup". Go to "Network configuration"


Select "Edit Devices"
Choose the network device
Fix the IP address and validate with "OK"
We need to change the hostname and fix the DNS address
Enter the Hostname
Oracle install needs a graphical install, so it's better to change the Display sittings


Reboot the system after these changes

We'll configure the repository so we can install the packages we need for Oracle. Insert the CD media of Redhat Server and copy "Server" folder in "/tmp"


Now go to "Applications" and "Add/Remove Software"

Click "Edit" and "Repository Manager". Click on "Add"


Give a name for the repository and specified the "Server" folder.


Now let’s create a user and groups for Oracle installation

#groupadd  oinstall
#groupadd  dba
#useradd -m -g oinstall -G dba -d /home/oracle -s /bin/bash -c "Oracle Software Owner" oracle
#passwd oracle


Change the "/etc/sysctl.conf" file to add (change) kernel parameters that are required for Oracle installation

The file should be as follows:

net.ipv4.ip_forward = 0
net.ipv4.conf.default.rp_filter = 1
net.ipv4.conf.default.accept_source_route = 0
kernel.sysrq = 0
kernel.core_uses_pid = 1
net.ipv4.tcp_syncookies = 1
kernel.msgmnb = 65536
kernel.msgmax = 65536
kernel.shmmax = 2147483648
kernel.shmall = 2097152
kernel.shmmni = 4096
kernel.sem = 250 32000 100 128
fs.file-max = 6815744
fs.aio-max-nr = 1048576
net.ipv4.ip_local_port_range = 9000 65500
net.core.rmem_default = 1048576
net.core.rmem_max = 4194304
net.core.wmem_default = 262144
net.core.wmem_max = 1048576

To make the active in the current session, run /sbin/sysctl -p command

Change "/etc/pam.d/login" file and add the followingn line:

session required pam_limits.so


Change "/etc/security/limits.conf" and add the following lines:

oracle              soft    nproc   2047
oracle              hard    nproc   16384
oracle              soft    nofile  1024
oracle              hard    nofile  65536


Create necessary directories for Oracle home

#mkdir -p /u01/home/oracle/product/11.2.0/db_1
#chown -R oracle:oinstall /u01


Change the entry of .bash_profile file of the oracle user and add following lines:

/home/oracle/.bash_profile

export ORACLE_HOME=/u01/home/oracle/product/11.2.0/db_1
export LD_LIBRARY_PATH=$LD_LIBRARY_PATH:$ORACLE_HOME/lib
export PATH=$ORACLE_HOME/bin:$PATH


Now copy downloaded oracle installation files to the /tmp directory


You need to logout from root account and login with oracle account. Open a terminal, point to install directory and execute this command (Before that make sure that oracle user has the right to execute from the install directory, so use chmod to grant these rights):

#cd /tmp/database
#./runinstaller


Select Create and configure a database and click next


Provide the name of the database and the password and click next

You'll get some errors, no worries you need to install these packages.


Check again.


Our database

The installation finished successfully.


Switch to the installation page and run both shell scripts with root user.


Login in with oracle user, open a new terminal, export ORACLE_SID variable and connect to the database.

#export ORACLE_SID=orcl